|
The Character
Studio
Modeling, Texturing and
Animating low-poly Lara Croft
- a tutorial for n00bies (well...,
not really ;)) -
Hey there
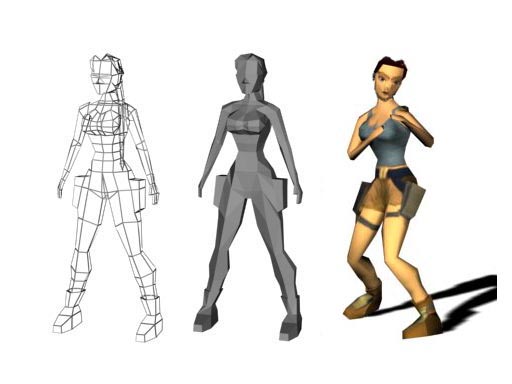
Welcome to the final part of the Lara
Croft Tutorial. In this part we will try to get some
movement in our model. So lets start.
1. Load your textured
Lara-model.
2. Select the model,
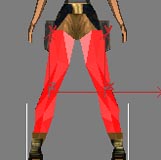
right-click on it and select "freeze selection" and the
quad-menu. Your model should now be gray, and you cannot
select it anymore. That's very good, as we are going to
create a biped-object which we will place exactly over
the Lara-model. Freezing the object, makes it easier to
scale the biped as you cannot select any wrong
things.
3. Now go to "create",
"systems", and select "biped" (first pic below). In your
front viewport, draw the biped. Start at the feets from
your Lara, hold down the leftmouse-button and stop at
her head. Try to get the same size as your Lara has, as
it is easier lateron. (you wont have to scale so much).
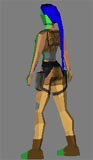
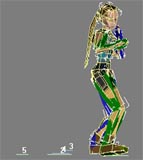
When done your viewport should show something like the
second pic below (I have not freezed the Lara-object,
that is why it is colored.)
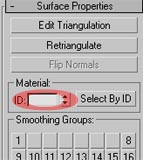
4. Ok. Next step is to
select the Object Bip01. Therefore: Click the "select by
name" button (first pic), select the Bip01 and click ok.
When done go to "motion" and activate "figure mode" (3rd
pic).
Hint: Everytime you
want to move the biped object, you have to select the
bip01, as it is the Core of the biped!!!
5. The figure mode
allows you to modify the biped-object. That is necessary
as the biped must fit our Lara-model perfect!! So we
have to move the farious object till they are in the
right position. In the next few steps I explain just a
few buttons and how to use them. Then you should be able
the modify the biped without further instructions.
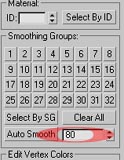
6. Befor we start
modifying the biped, scroll down to the
structure-settings and change the toes-value to 1. (pic
below)

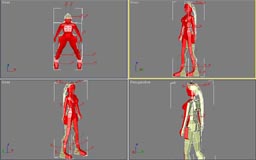
7. With the
Bip01-object selected, move the Biped so that it is
placed over the Lara-Model. (Hard to explain, just look
at the 2 screenshots, first: befor movement, second
after movement ;) ) (figure-mode must be activated!! -
step 4)
8. As we created our
Lara from bottom to top, we will do so with the biped
object. Therefore : Select the left-biped-foot (first
pic below), now change to your front viewport and move
it, so that it is exactly over the Lara-mesh (from
now on: LM for the Lara-Object and LB for the Biped
object) After that, you have to do the same with her
right foot. Look at the second pic below to see the
final result.


9. Do the same with her
arms.
10. Now just scale, move
and rotate the LB till it fits the LM perfect!!!
Hint: Befor you
scale her left foot, press the "symmetrical" button (pic
below), so the right foot is selected too, and will be
scaled, like the left. That is very important for the
animation lateron (we do not want that our Lara has a
big and a small foot ;) ), so always press the
symmetrical-button befor scaling!! (btw. Use
non-unifor-scaling to get the best results

11. When you have
scaled, moved rotated everything you should get a result
like shown below. (You have to do that perfect!!!!! So
take your time!!!!!)


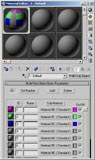
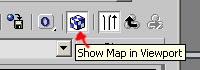
12. When done,
right-click somewhere in your front-viewport and select
"unfreeze all". Now you should be able to select your LM
again. Do so, and add the animation-modifier PHYSIQUE to
the stack (first pic below, btw: you should have an
"edit-mesh" modifier between unwrapUVW and Physique, so
dont make a head about you did anything wrong, just look
at the end of part 2 ;) ). Click the "attach to node"
button (second pic below), now click the select by name
button (3rd pic below) and select Bip01 and
press "pick". In the pop-up menu just click
"Initialize".

 
13. Very good. The LB
is now linked to the LM. Thats all. You did it !!!.
Nooooooo!!!!! Now the real problems start ;)
14. Save your project
(that is very important now!!, Save your project after
every step now, and always with an other name!!) Select
the object "Bip01 R Hand" (by pressing the button shown
in the 3rd pic above). Change to your front viewport and
move it around. The hand from the LM should follow your
commands. Very good. Problem is that there might be some
vertices which also move, but which should not move!!
Look at the 2 pics below to understand what I am talking
about ;)


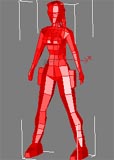
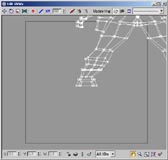
15. The 2 points which
are marked red in the second pic above are connected to
the wrong "bone". ...???... Remember in step 12 you
pressed the Initialize button. By doing that 3dsmax
tried to link every vertex to a bone. As 3dsmax doesnot
know which vertex belongs to which "bone", it just takes
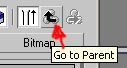
the nearest. Befor going further in the tutorial, click
the "back"-button so that the "Bip01 R Hand" -object is
on his original position or load the Lara-model from
step 14 (where I told you to save)
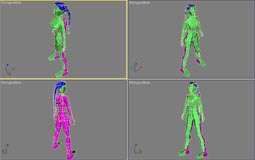
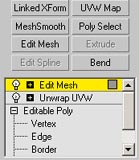
16. You can check
which vertex is connected to which "bone" by selecting
LM and opening the sub-object menu from the Physique
modifier and select "envelope". (1st pic
below). You should now see yellow lines which represents
the "bones". Select the one from the right hand (second
pic below). You can now see a colored envelope which
includes all the vertices which are effected by this
particular "bone".
17. As you can see,
the envelope is too big. It also effects the weapon
holster (It might be, that in your particular case, the
envelope fits the hand perfect. If so, please read the
following steps as well, as you have to check every
"bone")
18. Now select scale,
and re-size the envelope from the right hand so that the
weapon holster is not effected anymore. (3rd
pic above). Check and resize (if necessary) every
"bone". Be aware, that her pony-tail is not assigned to
any "bone". We will handle that problem later on. At the
end all vertices, except the ones from the hair, should
be connected to the right "bone" (take your time ;)
)
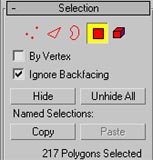
19. Her pony-tail:
Here I am just going to explain the easiest, but most
unrealistical solution ;) Change to vertex-mode (first
pic below). Select-button must be activated. select all
vertices which represents her pony-tail (second pic
below), find the "assign to link" button, and click it.
(3rd pic below). Now click on the bone which
represents her head. All the selected vertices should
now be RED. If not. The vertices which are not red are
still connected to an other bone. You have to check
again the envelope in this region!! (Step 16,...perhaps
some vertices are still effected by her "ass-bone", her
"bag-bone",...)
Hint: There also
exists the possibility to scroll down in the biped
structure-settings and change the ponytail1 value from 0
to 5. You would even get a better result. The reason why
I explained with the "assign to link" possibility is,
that I wanted to show you a few more buttons. You can
use the "assign to link" button with every vertex. For
example when you get to the limits with scaling the
envelope you can just select the vertex wich is applied
to the wrong "bone" and assign it to the right
link.
20. Save your model
again. Now play around with the biped-model, and look if
the LM follows the LB movements in the right way. Move
her hands, her feet, you can move them to some
unrealistical positions, we just do that, to check the
links between bones and vertices.
21. When done, our
Lara is ready for some motion. There are lots of buttons
to play around with, ... but that would be too much to
explain in this tutorial. The goal just was, to create a
character, texture it, and apply some physiques. Perhaps
I will do a tutorial for intermediate-users which
explains more about crowds, motion-flow, shared motion
flow,..
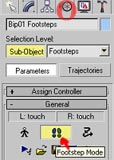
22. Well, in the first
part I promised to do a short animation. For that:
select the object Bip01 (you know how ;) ...select by
name,.... ) Activate "motion", and click on
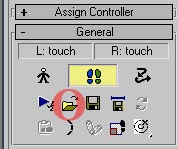
"foot-step-mode" (first pic below). Click on "load file"
second pic and load a .bip file which should be stored
in one of the 3dsmax/cstudio/tutorial/tutorial_1 to 9 .
If you cannot find a .bip file you have a problem ;) Try
to find some .bip files on the internet or where-ever.
For my animation I choose the Backkick.bip When loaded
your Lara should change her position. (3rd pic
below)
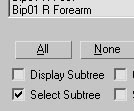
23. Click the "select
by name" button. In the pop-up-menu select "select
subtree" (1st pic below), select bip01 (all
bip-objects should now be selected, if not, you can
select them by hand), press the crtl-button and click on
the bip01-object again. Now all your bip-objects should
be selected, only the bip01 must be de-selected. (and
the lara-model ;) ). Press the select-button. Back in
your viewport, right-click on one of the selected
bip-objects and select "hide by selection". The
bip-objects should be hided and you can only see the
Lara-model. Thats it.
24. When you want to
load an other .bip file, just click on the bip01 (thats
the reason why we didnt hide it ;) ) and redo step
22.
25. Congratulations,
you have successfully animated your Lara-model.
26. Here
you can download my model (without
texture maps ;) )
27. If you recognize
that your model still have some problems, just select
the bip01, activate the "figure-mode" (you Lara should
be in her original position (the one you modeled in the
first part)). Then select the LM and activate envelope
again, and try to find the error.
So: Figure-mode: you can work on
the physiques, Footstep-mode: You can work on the
animation.
If you want to play the
animation, you must not be in figure-mode!!
28. It's now up to you
to place some lights, a camera, and create a good
looking environement. And please post some of your works
on the forum. I am really nosy. Oh, and also if you have
questions, just use the forum.
|