|
The Character
Studio
Modeling, Texturing and
Animating low-poly Lara Croft
-
a tutorial for n00bies -
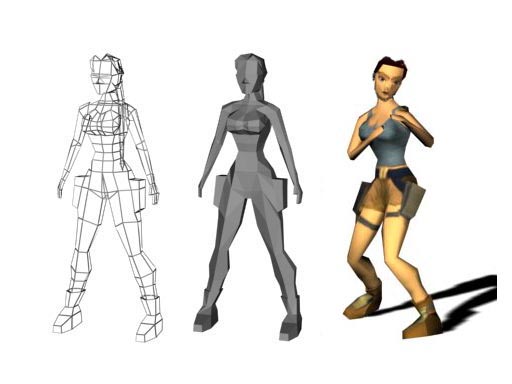
In this part, we'll try to create a
texture-map for our Lara-Model (in fact, we have to
create 3 texture maps ;) ). As there are lots of
possibilities to do that, I choose the one which is the
easiest to explain ;) There also exists programs like
BodyPaint or DeepPaint, but I guess not everyone owns
one of these programs, so I am going to use Adobes
Photoshop. You can use any 2D-paint-program you chose.
You can even use the paint-program which comes with
windows. In the first part I wrote that this will be
mainly a Photoshop-Tutorial, well thats not right, I
just wanted to say that most of the work is done with a
2D-program. I have not explained every step on how to
create a texture in Photoshop. I just give you the main
hints and hope that you will be able to create a cool
looking texture by yourself.
Alright, lets start:
1. If you have finished the first
part, load your Lara-Croft-Model; BUT if not, load the
model which is attached at the end of the first part.
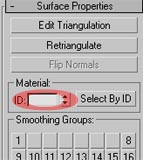
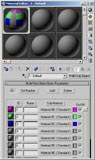
Select your model. In your modify-menu, activate the
poly-mode and mark your whole model. In your
modify-menu, scroll down till you find the surface
properties. (3rd pic below). Now type "1" in the
red-marked field and press enter.
Hint: That is necessary because
we are going to use a multi-sub-map. By now, we made
sure that the whole model has a material ID = 1. As we
are going to create 3 materials we have to repeat the
first step 3 times. Our first material will be her
backside. Our second material will be her frontside. The
last material will be her hair.

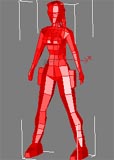 
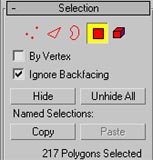
2. Therefor: Scroll up
in your modify menu till you find the
"ignore-backfacing" field (first pic below). Activate
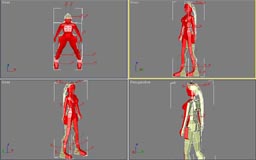
it. Now, in your front viewport mark your whole
Lara-Model. If you have activated "ignore backfacing",
only her frontside should be selected. (you can check
that in your perspectiv-viewport). If there are some
wrong polys selected press the ctrl-button and then
click on the poly. It should get de-selected. Especially
the polys at her bag,... It is very important that you
do NOT have any polys from the backside selected. So
rotate your perspective-viewport and deselect all polys
which should not be selected. (Take a look at the pic
below to see which polys must be selected.) Now scroll
down to the surface properties type 2 in the Material ID
field and press enter.
3. Last step is to
de-activate the "ignore backfacing" field again. Now
select all her hair and apply 3 in the Material ID
field.
Hint: You should now have a
model which has 3 Material IDs. You can test that by
clicking on the "Select By ID". In the pop-up window
type 1, 2 or 3 and press ok. Now only the ID should be
marked which you had selected....If not, just read on.
;)
4. Now open your
material editor (shortcut = "m"). In the first field
load a multi-sub-map (Click on the button "standard", a
new window should pop up. There you select
Multi/Sub-Object and click ok) and apply it to the model
(=the "assign material to selection"-button = 3rd below
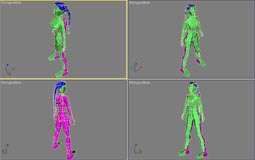
the spheres ;) ). Change the colors from the first 3
materials so that you can see the different IDs in your
viewports (first pic below) . Now take your time and
select the wrong polys (if there are any) and give them
the right ID. (just select the poly, scroll down to the
Material ID field (3rd pic - step1) and enter the right
ID). At the end your model should look like the one
below. (click to enlarge)
5. Very good. Now we
have prepared our model so that we can create some
texture maps. De-activate the poly-mode!! Add the
"Unwrap UVW" modifier to the stack. (the
modifier is called Unwrap UVW do not select any other
UVW-modifier!!! I have to write that cause I wrote some
tutorials and told to use a modifier and HOURS after the
tutorial was online I got several mails that the
tutorial does not work, just because they took the wrong
modifier. But that does not belong to here ;) ) When
done click the edit-button. You should see something
like the first pic below. Zoom out till you can see the
whole model. Select all the vertices and move them so
that the model fits the gray rectangle perfect. (very
important)
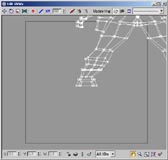


Hint: The gray
rectangle represents our picture which we do not have by
now ;) By placing the wireframe exactly into that
rectangle we can use it as a reference in photoshop. So
we know where to paint...
6. Now maximise that
window (I think that I do not have to explain everything
;) ) and zoom in so that the wireframe fits your whole
screen. When done, change from "all IDs" to "1" (the
field in the lower menu-bar). Now you should just see
the wireframe from the material ID 1. Make a screenshot
("alt" + "print"). Load your 2D-program (photoshop). In
photoshop go to "file" - "new". The Format should be
your screen resolution (as we loaded a screenshot from
the whole screen into the RAM.) (I took 1152x840, 28,346
pixel/cm, but that depends on your screen resolution!! -
most of you will take 1024x768 I guess). Click OK. You
should now have a white picture. Press "ctrl" + "v". You
previous taken screenshot should be loaded now. All you
have to do now: is to cut out the gray rectangle. Open a
new window and paste it there. (I am sure that I do not
have to explain that). At the end you should get a pic
like below. Redo that step with the material IDs 2 and
3. If for some reasons you do not manage to capture
screenshots and load them into your 2D-program, I have
added the 3 pics you need below. Just click to
enlarge


7. So far so good.
Save the 3 pics as a JPG (you can select high quality as
we are not going to import the model into a 3D Game).
Name the pics like: "back.jpg" (first pic above),
"front.jpg" (second pic above), "hair.jpg" (guess
what: 3rd pic above ;) )
8. Now comes the
funniest part: We have to fill the 3 wired jpgs with
some color. For that it is good if you have some
reference-pics. Therefor I have added several links to
Tomb Raider and Lara Croft galleries. Download some of
the pics which show her head or her shoes or her
trousers, as you can cut out what you need and put it
over the wireframe. I really do not know how to explain
that. If you have a basic knowledge of your 2D-program
you should know how to mix 2 pics.
Hint: Befor you
start to fill your pics. Add a new layer (first pic
below) (that only works in photoshop, not in the
standard windows-paint-program) and draw on this layer.
If you do so, you can change to opacity-value lateron
and still see the wireframe. That helps alot when
working on the details. Second pic below shows you the 2
most important buttons when you want to copy and paste
something form one pic into an other.


But enough of hints, here are the links
which might be usefull:
http://www.planetlara.com/picsmenu.asp
http://www.geocities.com/TimesSquare/Ring/4358/gallery.htm
http://www.geocities.com/TimesSquare/Ring/4358/gallery2.htm
http://www.geocities.com/TimesSquare/Ring/4358/gallery3.html
http://noctalis.com/dis/laracroft/gallery_a2.shtml
and if you need more:
http://www.google.com/search?q=lara+croft+game+gallery
9. Now its up to you
to create 2 nice texture maps (the hair is not that
important as we can fake a texturemap with some bumb
maps in 3dsmax ;), but if you want to do it perfect you
can do one for the hair too.). To help you a bit, how
they can look like I have added mine below. I have not
added the big versions as there is no use of just
copying my pics and map them on the model (probably also
mine, from the first part,... I am wondering why you
are reading the tutorial ;) )


10. Alright, when you
think that your pics look perfect, save them as .jpgs
and return to 3dsmax. Open your material-editor again
(shortcut = "m"). In the first field you should still
see the multi/-sub object with the 3 colors we created
befor. Now select that material and scroll down to the
basic parameters. Click on the button near the Material
ID1 (first pic below). Now the sphere in the material
editor should have the color you have applied befor. (I
used some violet). Now scroll down to the maps-section
and click on the diffuse-map-button (second pic below).
Click it and select bitmap in the pop-up menu. Select
your backside-jpg.


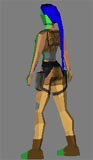
11. To see the pic in
your viewport press the button shown in the first pic
below. You viewport should now show something like the
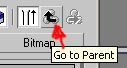
second pic below. If you have succeded, back in the
material editor, click 2 times the "go to parent button"
to get back to the main-material directory. (so that you
can see the 3 material like in the first pic above)
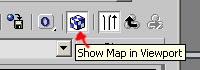
12. Now repeat that
with the material 2. Load your front.jpg, and click the
"show map in viewport". If you have a map for the hair,
repeat the steps 10 and 11 for that too. If you do not
have a map for the hair, just select a nice brown
instead of the blue. That's it. You have sucessfully
textured our Lara. It wasn't that difficult, wasn't it?
;)
Hint: If there is a problem,
for example if the texture map is not there where it
should be, click the edit-button in the unwrap-uvw
modifier and look if the wireframe is in the right
position. 3dsmax places the texture-map exactly there
where the wireframe is. Move it around and you will find
out what I am talking bout ;)
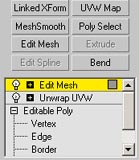
13. On big problem is
left: Our Lara has lots of ugly corners. Therefore add
the "edit mesh"-modifier to your stack. (first pic
below)
NEVER EVER CHANGE SOMETHING
BELOW THE UNWRAP UVW MODIFIER !!!!!!!!!!
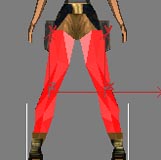
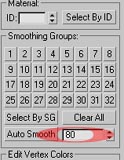
14. When done change to
poly-mode and select all the polys from her feet.
(second pic below). Scroll down till you find the
smoothing groups. Change the value to 80 (That's a value
you can play with, just try what looks good for you).
When done press the autosmooth button which is nearby.
The corners should be gone. Do that with her arms, her
tits, and her face.
Thats it! There is nothing more to say.
I have not added the finished project this time, as I
want you to play around with all the new buttons and not
just load my model. Next time we are going to create a
biped model and create a small avi-clip by animating our
Lara-Croft-Model.
|