|
The Character
Studio
Modeling, Texturing and
Animating low-poly Lara Croft
-
a tutorial for n00bies -
by
Eumel3d
Hey there,
Its been a while since my last
real tutorial. Therefore I wanted to make
something special. Lots of people asked me how to handle
the character-studio, but there were also lots of
questions about low-poly characters, so I decided to
make two tutorials in one ;-)
In this tutorial I am going to explain
how to model a low-poly Lara Croft out of a box.
Second step will show you how to
texture the character. That tutorial will be mainly a
photoshop tutorial.
In the last tutorial you will learn how
to create a biped model, how to attach it to the
low-poly-character, how to handle problems (which will
definitly occur ;) ), and how to animate it.
At the end we are going to create a
small avi-clip, to see if the biped-model fits our
Lara-model. You
can download the final animation by clicking
here!
All three tutorials are for n00bies
;)
So this time the Character-Studio
tutorial will show you just the basics, means: how to
work with the modifier PHYSIQUE and how to load a .bip
file. You will not learn anything about footstep mode,
motion flow, crowds,... (thats gonna be a seperate
tutorial)
So far so good, lets start:

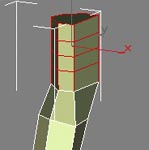
1. First of all: Load
or reset 3D Studio Max.
As we are going to box-model our
character, we gonna start with a box ;) Create one in
your front viewport (lenght = 10, width = 10, height =
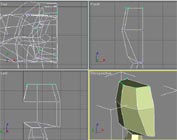
20, lenght segs = 1, height segs = 1)
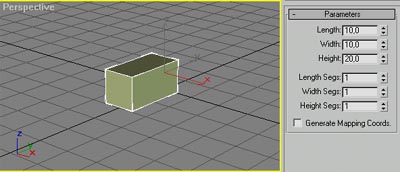
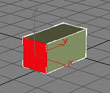
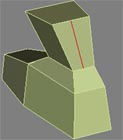
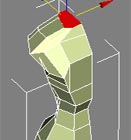
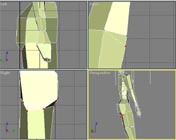
Alright, your perspective-viewport
should show something like the pic above. By the way: we
only create one half of the character; at the end we
weld the two halfs together ;)
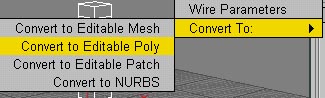
2. Right click on
the box, in the pop-up menu, go to convert to and
select convert to editable poly
Alright, we now have a basic
poly-model. In the next few steps we are going to create
one foot out of it. For that we are going to use: Create
line, Cut, Extrude, Bevel. (and some other stuffs which
are not that important right now.)
Ok. We are going to start at the bottom and will work
our way through to the top.
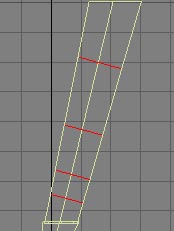
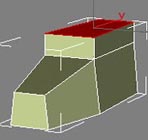
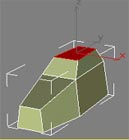
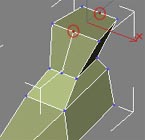
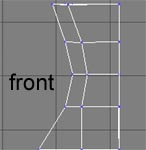
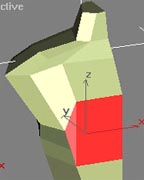
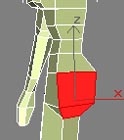
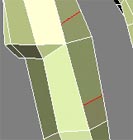
3.
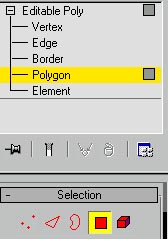 Therefore: activate the polygon-mode in your
modify-menu and select the front polygon (pic on the
right). To see the selected polygon as a full red one
(like on the right) press the "F2"-button on your
keyboard. Therefore: activate the polygon-mode in your
modify-menu and select the front polygon (pic on the
right). To see the selected polygon as a full red one
(like on the right) press the "F2"-button on your
keyboard.
 Hint: By pressing the
"F2" button the selected polygon will be shown faceted
but only in the activated viewport. So if you want to
see that effect in all 4 viewports you will have to
press 4 times the "F2"-button (in every
view). Hint: By pressing the
"F2" button the selected polygon will be shown faceted
but only in the activated viewport. So if you want to
see that effect in all 4 viewports you will have to
press 4 times the "F2"-button (in every
view).
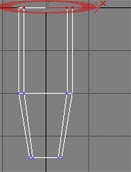
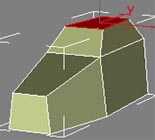
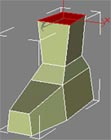
When selected sroll down, find the
extrude field and extrude that polygon about 15 units.
Then enter "-2" in the outline field and press enter.
The poly should now be a bit smaller than the original.
Last step is to change to your front-viewport and move
the just extruded poly a few units down. (last pic on
the bottom shows the final result)
 4. Activate
non-uniform-scale. (It must be the non-uniform-scale, so
click on the scale-button and hold down the
left-mouse-button and select the right scale) 4. Activate
non-uniform-scale. (It must be the non-uniform-scale, so
click on the scale-button and hold down the
left-mouse-button and select the right scale)
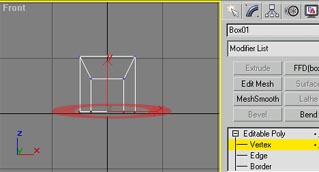 Now activat Now activat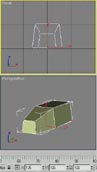 e vertex in the modify-menu, in
your front viewport select all the lower vertices
(ignore backfacing must be deactivated!!). e vertex in the modify-menu, in
your front viewport select all the lower vertices
(ignore backfacing must be deactivated!!).
When done scale the selected vertices
in your front viewport (I scaled them 125 125 100
(you can see those values below the
perspective-viewport. If you scale the vertices, those
numbers should change) - look at the pics on the
right - click to enlarge)
 hint: by
clicking on the button shown in the pic on the
right, you can enter the values manually, and dont have
to play around with nerv-taking mouse-movements ;) hint: by
clicking on the button shown in the pic on the
right, you can enter the values manually, and dont have
to play around with nerv-taking mouse-movements ;)
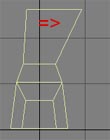
After that, change to your topviewport,
select the vertices shown below on the left and scale
them 75 75 100 as on pic on the right (click to enlarge)
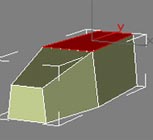
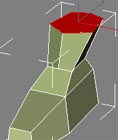
5. Activate polygon in
the modify menu, change to your perspective viewport,
select the top-poly and extrude it 4 units (like in step
4)
Activate non - uniform - scale and
enter manually the values x = 70, y = 60, z = 100 (look
at the hint in step 4)
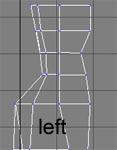
Now change to your left viewport select
the vertices shown on the right and move them slightly
inwards
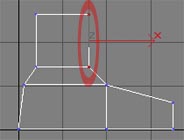
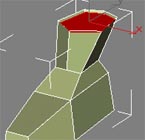
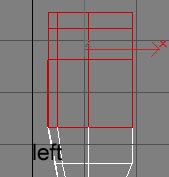
6. Change back to
polygon-mode, select the top-poly and extrude it 12
units.
Activate non - uniform - scale and enter
manually the values x = 170, y = 100, z = 100
After that, change to your front-viewport and move
the selected poly a bit to the right.
Now change to your left-viewport and activate the
vertex-mode, select the shown vertices and move them a
few units to the left.
Hint: By pressing the crt-button you
can select multiple vertices - first select the upper
ones, when done press the crt button and select the
lower ones
7. Okay, we have
finished the basic boot-model, now we have to refine it
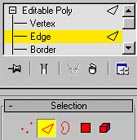
a bit: Therefore, activate theedge-mode (very
important!!) in the modify menu, then scroll down
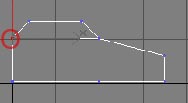
till you find the cut-button - click it.
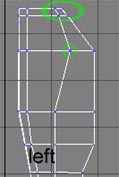
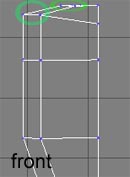
Now, in your perspective viewport make
a cut as shown below!
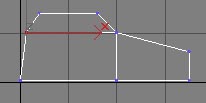
Make a second cut on the backside of
the boot. When done, change to vertex-mode and move the
2 new upper vertices so that the top of the boot
represents a "circle".

Hint:
select the vertex you want to move
in your perspective-viewport, then change to your
top-viewport and move it - this avoids that you select
some backfacing vertices.
8. Change to
polygon-mode, select the top-polygon and extrude it -0,5
units, then enter -0,5 in the outline field and press
Enter. You have now created a poly which is a bit
smaller than the original one and which is inside our
boot.
When you have done everything the
right way you should have one boot from our
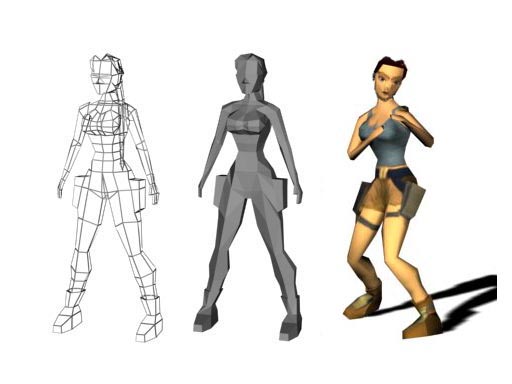
low-poly-Lara right now. Congratulations.
On the next side we gonna create her
torso.

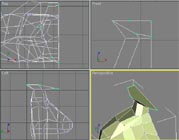
Alright, creating the boot was not that
difficult. But that should change right now. As creating
the torso forces lots of vertex-movement which is really
hard to explain, you will have to try around a bit till
you find the right positions. I have added lots of
screenshots which should help. If you still have
troubles to follow the commands, just write me a pm or
try to reach me over mail or msn.
1. Now, in the first
part we have created the boot from our Lara, its now
time to create her foot:
Therefore: go to polygon-mode select
the last created polygon, search the extrude-field and
enter a value of about 75.
When done, change to your
front-viewport and move it a few steps to the right.
Last step is, to scale it (change back to uniform-sale).
(x=160 y=160 z=160)
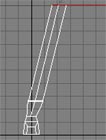
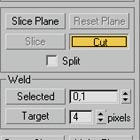
2. Change to
edge-mode, find the Slice-Plane-button and click it. A
yellow plane should appear. With that plane it is
possible to refine our foot. As it is not in the right
position we have to rotate it a bit. Go to your left
viewport and rotate it 90°, then change to your
front-viewport and rotate it about 15° and move it till
it is on the same position as it is on the picture on
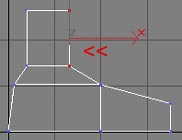
the right. When done, click the slice button.
 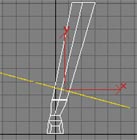
You have to do that 4 times so move
your plane upwards and click the slice-button again. The
picture below shows you the positions where you have to
slice.
When done change to vertex-mode and
move the new created vertices as shown on the right. It
hard to explain, just play around till it looks good.
(first you have to move them in your front-viewport,
then in your left-viewport) - click the pic to enlarge.
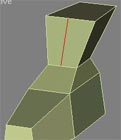
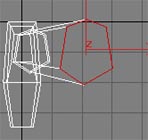
3. Change back to
poly-mode and select the upper poly. Extrude it 17
units.
 When done, in vertex-mode, change the
positions of the new created vertices like shown on the
right. (click to enlarge) When done, in vertex-mode, change the
positions of the new created vertices like shown on the
right. (click to enlarge)
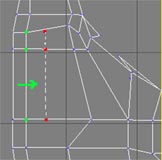
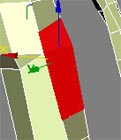
Move the vertices in your top-viewport
- the red thing is the position of the vertices after
the extrusion, the green thing is the position we want
to have. In your front-viewport, move the green-marked
vertices a few units down.
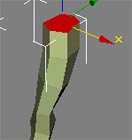
4. In the next step we
want to create her belly. For that we have to extrude
the top-poly 4 times.
Change to poly-mode, select the
top-poly and extrude it 8 units. (type "8" in the
extursion-field and press Enter), Then type 6 and press
enter, then type 6 and press enter, at last, type 7 and
press enter. You should now have a model like shown on
the right. When done change to vertex-mode and move he
new created vertices like shown.
Attention: You also
have to move the vertices from the back - so make sure
that you select every vertex (especially when working in
the front-viewport) - first check the
perspective-viewport if you have selected all the
vertices you want to move!!
5. Change to poly-mode
and extrude the top-poly 13 units, after that extrude it
again 6 units, and a last time 3 units.
Change to vertex-mode and move the vertices as shown
below
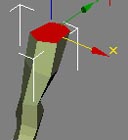
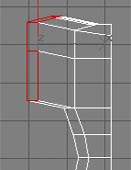
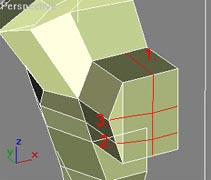
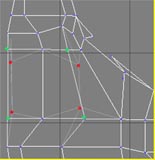
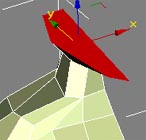
6. Next step is to
create the shoulder:
Change to poly-mode and select all the
polygons shown on the right (9 polys) (by pressing the
ctr-button you can select multiple polygons). Extrude
them 10 units (second pic). Go to vertex mode and
re-position the new vertices like shown in the last pic
on the right. (click to enlarge! The red dots show the
position of the vertices after the extrusion, the arrows
show you where you have to place them. I know it is a
bit complicated ;) )

7. Next step is to
create the neck.
Change to polygon-mode and select the
top poly, extrude it 5 units. After that change to
vertex-mode, go to your front-viewport and move the 4
left vertices slightly to the right. (you can only
see 2 vertices in your front viewport - the others are
backfacing!! - I have explained that before - check your
perspective-viewport if you have selected all vertices
you want to move!!); then go to your
left-viewport and move them as shown. (click to enlarge)
8. Its time to see
what's our model going to look like, when we clone and
mirror our half. Therefor:
Go to Edit - Clone. Select "Copy" in
the pop-up menu and press ok. You have now 2 halfs which
are exactly on the same position, means: that you can
still ony see one object. With your perspective-viewport
activated and one half selected, go to "tools" -
"mirror" and click ok. All you have to do now, is to
move the mirrored half in the right postition.
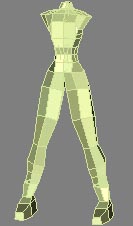
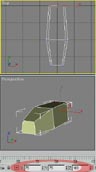
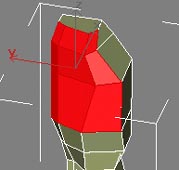
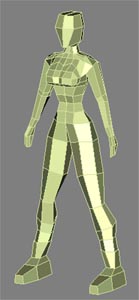
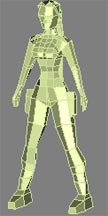
If you have done everyting the
right way, you should see something like the pic above -
Congratulations!!
On the next part, we are going to create her tits,
her arms and her basic head...

Alright, if you have cloned our half of
the model, you can delete it again ;) It just showed you
how the model is going to look like. You can clone and
mirror the model whenever you want but it is easier to
work on one half when you do not see any other confusing
objects. So far so good, lets start to model her tits ;)
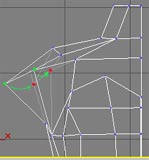
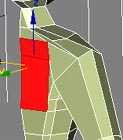
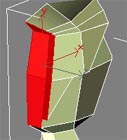
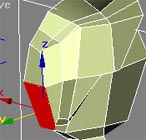
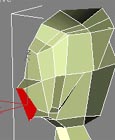
1. Creating her breast
is not that difficult. Change to polygon-mode and select
the 2 polys shown on the right, extrude them 9 units (as
Lara is famous with her big tits ;) ). Next, change to
edge-mode, click the cut-button (like we did when we
refined the boot in part 1) and refine the model like
shown on the right. (the red lines are the ones you have
to create, the numbers show you in which order you have
to create them) - It can happen that there suddenly
appear some strange lines when you refine the model. If
that happens, click the "undo"-button and try to create
the line from the opposite direction.
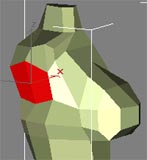
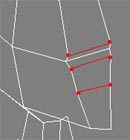
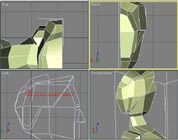
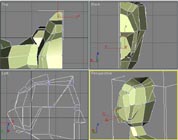
2. Well, hmm the next
step is really hard. You have to move all the new
created vertices so that they form a good looking
breast. There is nothing I can explain here, cause
everyone knows how a breast should look like. I have
added 2 screenshots which should help a lot (in the
first screenshot, the yellow shape is the breast after
the extrusion, the black mesh is the breast after the
vertex movement, the second screenshot shows you the
final result). Just try to form a ball. The easiest way
is, if you start in your left-viewport, and than change
to your front-viewport. It could also be usefull if you
clone and mirror the half sometimes so that you can see
how the final result will look like.

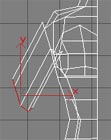
3. Very, good :)
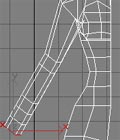
In the next few steps we are going to
create her arm. Therefore, activate vertex-mode, go to
your left-viewport and move the 3 vertices shown on the
right so that they are placed exactly in the middle.
(green=vertices before the movement, red=vertices after
the movement). When done move the 4 vertices like shown
in the second pic.
Now change to your front viewport and
move the 2 shown vertices to the right. When done,
change to poly-mode and select the 2 shown polys.
Extrude them 10 units.
4. When you have
extruded the 2 polys, change to your left viewport and
move them slighty to the right. (you know how a body
looks like ;) )
Now change to your front-viewport and move the poly
like shown in the second pic.
Last step is to rotate the poly about 35° and scale
it (70,70,70) (click the last pic to enlarge)

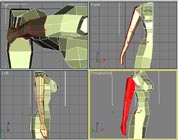
5. Ok, when we now
look at our model we recognize that the shoulders are
too small. (I am sorry for that but I am modelling the
whole stuff while writing this tutorial and I do not
want to write the whole stuff again ;) hope you
understand that.) - Alright, change to vertex-mode
select the shown vertices in your front-viewport and
move them to the left, till the shoulder looks better.
Change back to poly-mode select the 2 last created
polys and extrude them 5 times: 5, 15, 5, 5, 5.

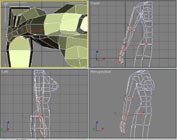
6. Next step is again,
a bit tricky, but I am sure you will get it. Again, we
have to move the vertices so that, the just extruded
polys look like a arm. Look at the 2 big screenshots
(click to enlarge) - This time the best thing to do will
be when you start in your front-viewport. - All you have
to do, is to scale and move the vertices.
(Attention: but be aware that you
just select the vertices you want to move!!!!!)
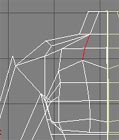
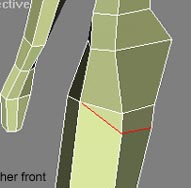
7. Now we have to make
a cut like shown on the right. Go to your front
viewport, activate edge-mode and click the cut-button.
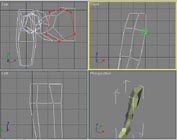
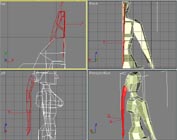
Attention: before we
start with the head, you should check your whole
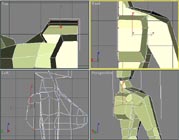
character if the vertices are in the right position.
Rotate the model in your perspective-viewport, make a
copy (you can also make a reference) and mirror it,
place a light or whatever, just to see if there is
anything strange. You should really take the time to
tweak around a bit, especially her breast and the arm.
You can also render the scene to see if there is
something wrong...
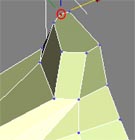
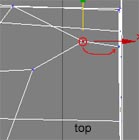
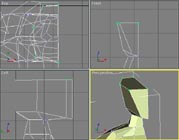
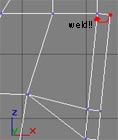
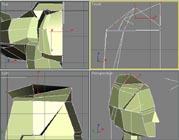
8. The Head:
Change to vertex-mode; in your perspective-viewport
select the vertex shown on the right, change to
top-viewport and move it till it is on the same position
as the vertex which is on the right side of this vertex.
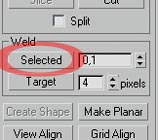
When done select the 2 vertices which are on the same
position right now, search the weld-selected-buttton in
the modify menu and click it. If you get a message "no
weldable vertices within treshhold" you have done
something wrong. If you do not get a message, everything
is alright. You can check if 3dsmax weld the vertices
together by looking in the selection-menu. There should
stand something like "vertex 122 selected". Very good.
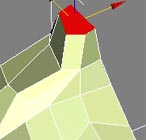
9. Change to poly-mode
and select the top-poly, extrude it 2 units. When done,
in vertex-mode, move the vertices like shown. (thats
gonna be her chin) - click to enlarge.
10. Guess what comes next ;)
Change to poly-mode and select the
top-poly, extrude it 10 units. When done, move it so
that it is exactly above the previous polygon.In
vertex-mode, move the vertices like shown. (thats gonna
be her face) - click to enlarge.
11. And for a last time:
Change to poly-mode and select the
top-poly, extrude it 9 units. When done, move it so that
it is exactly above the previous polygon.In vertex-mode,
move the vertices like shown. - click to enlarge.
12. When you now,
copy and mirror the half you should see something like
the pic on the right. Congratulations ;)
In the next part, we are going to work
on some details and her hair. (that's not too
complicated ;) )

The details are easy to handle, the
big problem is to model her hair. I am sure some of you
will get real troubles to follow the screenshots,
therefore I have added the finished project at the end
of this part. So you can take a look at it how it should
look like, and perhaps you can see easier where to place
the vertices.
1. Alright, we gonna
start with the easier part: the details:
If you have cloned and mirrored our half, delete
it.
When done, activate edge-mode, go to
your perspective viewport , and make 2 cuts like shown
on the right. With that 2 cuts we can form her ass ;)
(in fact, it is only one cut, but as it is easier to do
it in 2 steps...).
2. Change to vertex mode
and move the new created vertices, so that they form a
good looking ass ;) (click on pic to enlarge)
Note: I think that
by now I do not have to explain every step, you should
know how to move the vertices.
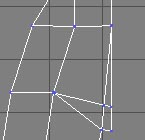
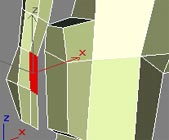
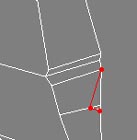
3. Go to poly-mode and
select the 2 shown polys; extrude them about 2 units (it
does not matter how much you extrude them cause we have
to move all the vertices so that they form a straight
vertical line. That is very important when we want to
weld the 2 halfs together lateron. First of all, move
the upper vertices so that they are exactly above the
nearest vertices on their left. - Weld them together (we
did that once beforee). When done move the other
vertices.
4. Creating the weapon
holster:
Change to edge mode and make 2 cuts like shown on the
right.
Change to poly mode select the 2 polys and extrude
them 5 units
Change to vertex-mode and move the new created
vertices.
5. Creating the thumb:
Change to poly mode select the poly and extrude it 5
units
Change to vertex-mode and move the new created
vertices. (click on pic to enlarge)

6. Creating the bag:
Change to poly mode select the 2 polys and extrude
them 2 times 3 units
Change to vertex-mode and move the new created
vertices. (click on pic to enlarge)
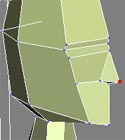
7. Creating her face:
Change to edge-mode and make 3 cuts.
Make another cut (it doesn't have to be exactly in
the same position as on the pic as you can move the
vertices lateron)
Go to vertex-mode, in your
left-viewport move the vertex which represents the nose
a few units to the right.
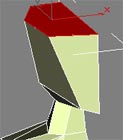
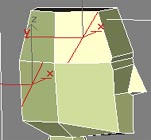
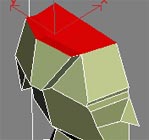
8. Now comes the
trickiest part of this tutorial: her hair. Change to
edge-mode and make 2 cuts. After that, change to
poly-mode and select the shown polys. Extrude them 2
units.
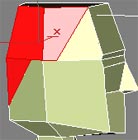
9. Make a cut like on the first pic.
Select the shown polys and extrude them
3 units. When done, change to vertex mode and move the
vertices as shown. (click on pic to enlarge). btw.: good
luck ;)
10. Select the shown
polys and extrude them 3 units. When done, change to
vertex mode and move the vertices as shown. (click on
pic to enlarge). btw.: good luck ;)
11. Select the shown
poly and extrude it 3 units. When done, change to vertex
mode and move the vertices as shown. (click on pic to
enlarge). btw.: good luck ;)
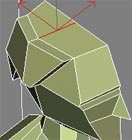
12. When you have
managed to make the hair so far, the next few steps are
easy to handle. You have to extrude the last created
poly, then change the vertices-positions and extrude the
new poly again. The pic on the right shows the final
result.
All in all you have to extrude the poly 9 times.
13. That's it, you
have successfully finished the modeling tutorial. All
you have to do now is, to delete all the polys shown on
the right (in the popup just click ok), when done, copy
and mirror the half and place it exactly where it
should be ;). When done search the attach-button and
attach the second half. Now select all the vertices
shown on the right and press the "weld-selected"-button.
(change the value to ~3, not more, to be sure that you
weld all vertices) Congratulations!!

In the case you experienced some problems and you
were unable to solove them by yourself, feel free to DOWNLOAD
my finished Lara-Croft-Model (3D
Studio Max format)!
|